Repairing a tear in a leather car seat is simple. You just need the right tools and method.
Start by assessing the tear’s size and location. Leather car seats add luxury and comfort to any vehicle. But, they are prone to wear and tear. A small tear can become a bigger problem if ignored. Repairing these tears is a skill every car owner should know.
It saves money and keeps your car looking great. Whether the tear is small or large, fixing it can restore your seat’s appearance. With patience and the right approach, you can make your seat look new again. This guide will show you how to repair leather tears effectively. So, let’s dive into the steps needed for a perfect fix.

Credit: www.tearmender.com
Identifying The Damage
Spotting the damage is the first step in fixing a leather car seat tear. Inspect the seat to understand the tear’s size and shape. This will help decide on the best repair method.
When you first notice a tear in your leather car seat, it might feel like a disaster. But before jumping to conclusions, the first crucial step is identifying the damage. Understanding the specifics of the tear can make all the difference in how you approach the repair process. Let’s dive into how you can assess the damage effectively.
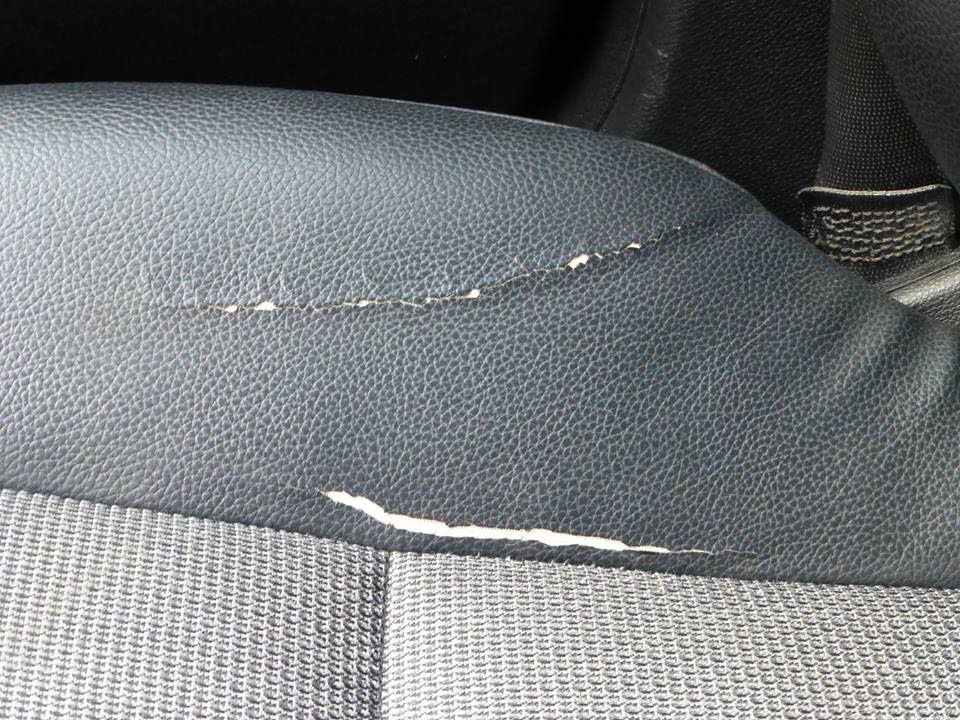
Types Of Tears
Leather car seats can suffer from various types of tears. Some common types include surface scratches, which are minor and often just affect the top layer of the leather. Cuts and rips are more severe, slicing through the leather entirely and sometimes exposing the foam beneath.
Understanding the type of tear helps you decide on the right repair technique. For instance, a surface scratch might only need a simple leather conditioner. Meanwhile, a rip may require more intensive measures like a leather repair kit.
Assessing Severity
Once you’ve identified the type of tear, the next step is to assess its severity. Is the tear small, like a less-than-an-inch nick, or is it a large rip spanning several inches? The size and depth of the tear will influence the repair method you choose.
You might feel a small sense of relief if it’s just a minor scratch. These are often easily fixable with household items. But a deep gash or a tear exposing the seat’s foam may require professional attention or specialized products.
Now, think about this: What if you could prevent future tears by understanding the cause? Is it wear and tear from daily use, or perhaps damage from sharp objects? Identifying the cause can be just as important as fixing the damage itself, helping you keep your car seats pristine for longer.
By taking the time to properly identify and assess the damage, you set yourself up for a successful repair. It’s not just about fixing what’s broken; it’s about understanding the problem so it doesn’t happen again.
Credit: www.reddit.com
Gathering Necessary Tools
Start with gathering essential tools like leather cleaner, adhesive, and a patch kit for repairing a leather car seat tear. Ensure you have sandpaper, a cloth, and a color-matching dye to complete the repair effectively. Having the right tools makes the process smoother and more efficient.
Gathering the necessary tools is the first step towards repairing a tear in your leather car seat. It’s like preparing for a journey; you need the right equipment to ensure success. Without the right tools, you might find yourself frustrated and unable to complete the task effectively. So, before you dive into the repair process, let’s make sure your toolkit is well-stocked and ready to go.
###
Basic Repair Kit
A basic repair kit is essential. It typically includes leather adhesive, a patch, and a colorant to match your seat’s hue.
Leather adhesive is your best friend for sealing that tear. It’s easy to apply and dries quickly.
A patch can be useful for larger tears. Ensure the patch material matches your seat’s leather texture.
Colorants are key for blending the patch seamlessly into your seat, so choose wisely.
###
Optional Tools
While the basic kit covers most repairs, optional tools can make the job easier and more efficient.
A heat gun can help set the adhesive faster. It’s handy, but not necessary if you’re patient with drying times.
A leather conditioner keeps the repaired area supple and prevents future cracks. It’s an investment in your seat’s longevity.
Consider using a sewing kit for intricate repairs. It might surprise you how much it helps in reinforcing the patch.
Have you ever wondered what might happen if you skip some of these optional tools? They can make the difference between a temporary fix and a lasting solution.
In your experience, what tool has proven unexpectedly useful in DIY repairs? Share your thoughts; your insights could guide someone just starting their journey.
Preparing The Leather Surface
Start by cleaning the leather with a gentle solution to remove dirt and oils. This ensures better adhesion for repair materials. Let it dry completely before applying any patches or glue.
Preparing the leather surface is the crucial first step in repairing a tear in your car seat. This step ensures that the adhesive and patch materials bond effectively, making your repair job last longer. Remember, the more thorough you are at this stage, the better your results will be.
Cleaning The Area
Before diving into the repair, it’s essential to have a clean surface. Dust, dirt, and oils can prevent adhesives from sticking properly. Use a mild leather cleaner or a mixture of water and a few drops of mild soap.
Gently wipe the area with a soft cloth, ensuring you cover a slightly larger area than the tear. After cleaning, dry the surface with a clean towel. Make sure no moisture remains, as this can interfere with the adhesive process.
Trimming Loose Threads
Now that the area is clean, inspect the tear for any loose threads. These can prevent the patch from lying flat, resulting in a bumpy finish. Use a pair of small, sharp scissors to carefully trim any threads sticking out.
Be cautious not to cut too close to the leather, as this could enlarge the tear. Have you ever noticed how a little patience goes a long way? Taking the time to ensure the threads are trimmed neatly can make a huge difference in the final appearance of your repair.
As you prepare the surface, think of it as setting the stage for success. Each small step you take now will pay off when you see a smooth, seamless repair. What other small tasks could you apply this meticulous attention to in your daily life?
Repair Techniques
Repairing a tear in a leather car seat can seem daunting. But with the right techniques, it’s simpler than expected. Leather repair methods can restore your seat’s appearance and function. Let’s explore two effective techniques to fix those unsightly tears.
Using Leather Adhesive
Leather adhesive is a quick fix for small tears. First, clean the area around the tear. Removing dirt ensures the adhesive bonds well. Apply the leather adhesive carefully. Use a thin layer to avoid mess. Press the torn edges together firmly. Hold for a few minutes, allowing it to set. This method works best on clean, dry leather.
Applying A Patch
Patching is ideal for larger tears. Start by cutting a piece of leather slightly bigger than the tear. The patch should match the seat’s color and texture. Clean the torn area thoroughly. Apply adhesive around the tear’s edges. Place the patch over the tear. Press down to secure it firmly. Allow the adhesive to dry completely. This technique hides large tears effectively.
Color Matching
Repairing a tear in a leather car seat isn’t just about fixing the damage. It’s also about ensuring the repair blends seamlessly with the rest of the seat. Color matching plays a crucial role in achieving this. A mismatched color can draw attention to the repair, making it look more obvious. Proper color matching ensures a smooth finish that complements the original leather.
Selecting The Right Dye
Choosing the right dye is essential for a perfect match. Start by identifying the exact color of your leather seat. Use a color swatch or sample piece to compare. Ensure the dye is suitable for leather material. Consider the type of finish on your leather, whether matte or glossy. Test the dye on a hidden part of the seat. This helps to see how it looks once applied. Adjust the dye if needed for a closer match.
Blending Techniques
Once you have the right dye, blending techniques come into play. Apply the dye gently using a sponge or brush. Use small, circular motions for an even application. Blend the edges of the dyed area with the surrounding leather. Feathering the edges helps avoid hard lines. Layer the dye gradually to achieve the desired shade. Allow each layer to dry before adding another. This method ensures a natural, seamless look.
Finishing Touches
Repairing a tear in a leather car seat can be simple with the right tools. Clean the area, then apply a leather repair kit. Smooth the surface for a seamless finish.
Completing the repair of a tear in your leather car seat involves more than just patching up the hole. The final steps, often overlooked, are crucial in making the repair blend seamlessly with the rest of the seat. These finishing touches ensure your seat not only looks good but also lasts longer. Have you ever spent time fixing something only to find it still stands out? Let’s ensure your leather seat repair doesn’t fall into that category by focusing on smoothing the surface and sealing the repair.
Smoothing The Surface
After applying the patch or filler, you might notice that the surface isn’t as smooth as you’d like. This is where a little patience and technique come into play. Use a fine-grit sandpaper to gently sand the repaired area.
Check the texture frequently to avoid over-sanding. The goal is to match the repaired area with the rest of the leather surface. A smooth finish not only looks better but also feels more natural when you run your hand over it. Wouldn’t you prefer a repair that feels as good as it looks?
Sealing The Repair
Once the surface is smooth, the next step is sealing it to protect your hard work. Choose a high-quality leather sealant that matches the finish of your seat. Apply a thin layer over the repair, extending slightly beyond the edges to ensure complete coverage.
Allow it to dry completely, as per the product instructions. This sealant acts as a protective layer, guarding the repair against wear and tear. It also helps in blending the color and texture with the rest of the seat. Remember, your car seat faces daily use, so a good sealant is your best defense against future damage.
By focusing on these finishing touches, you ensure the repair not only looks professional but also withstands the test of time. What steps will you take to ensure your repair meets your standards?
Maintaining Leather Seats
Fixing tears in leather car seats enhances their look and lifespan. Clean the area around the tear first. Apply a leather repair kit with patches and adhesive to restore the seat’s surface.
Maintaining leather car seats ensures they remain elegant and durable. Leather seats add sophistication to any vehicle. But without proper care, they can wear out quickly. Simple maintenance can extend their life and keep them looking new. Here, we explore effective methods to maintain leather seats.
Regular Cleaning
Regular cleaning is vital to maintain leather seats. Dust and dirt settle on seats daily. Use a soft cloth to wipe them often. Vacuum the seats weekly. This prevents dirt from embedding into the leather. For deeper cleaning, use a damp cloth with mild soap. Rinse with another damp cloth to remove soap residue. Finally, dry the seats with a clean towel. Avoid harsh chemicals as they can damage leather.
Using Protective Products
Protective products shield leather from damage. Leather conditioners keep seats soft and prevent cracks. Apply a conditioner every few months. This keeps the leather supple. Some conditioners also provide UV protection. This is crucial as sunlight can fade leather. Use leather protectants to form a barrier against spills. These products make cleaning easier. Always choose products meant for automotive leather. Test a small area first to ensure no discoloration occurs.
When To Seek Professional Help
Leather car seats can add a touch of luxury to your vehicle, but dealing with tears can be frustrating. While minor repairs can often be done at home, there are times when seeking professional help becomes essential. Recognizing when it’s time to call in the experts can save you time, effort, and ensure a seamless repair.
Evaluating Complex Repairs
Some tears are not as straightforward as they seem. If your car seat has a complex tear with jagged edges or extends into seams, DIY methods might not be effective. Imagine trying to fix a deep tear only for it to worsen with every attempt. You wouldn’t want to make the damage worse by using incorrect techniques or materials.
Consider the size and location of the tear. If it’s in a high-stress area like the seat edge or near controls, it might require reinforcement that only a professional can provide. Think about the long-term durability of your repair. A professional can use techniques and materials that ensure longevity.
Finding A Leather Specialist
Finding the right leather specialist can be a game-changer. You might think it’s just about stitching up a tear, but a specialist brings expertise and precision. Start by looking for local reviews and recommendations. A trusted specialist has the skills to match your leather’s color and texture, making the repair nearly invisible.
Ask questions about their experience and techniques. How do they handle complex repairs? Do they have examples of past work? A good specialist will be transparent and provide insights into the repair process. Don’t hesitate to inquire about warranties or guarantees for their work.
Think about this: Would you rather have a quick fix or a repair that restores your seat to its original glory? A professional can offer insights and solutions that you might not have considered.
When evaluating your leather car seat repair, always weigh the pros and cons. DIY might be appealing, but sometimes professional help is the smarter choice. Have you ever tackled a DIY project and wished you had called an expert sooner? Share your thoughts and experiences in the comments below!
Credit: www.youtube.com
Frequently Asked Questions
How Much Does It Cost To Fix A Rip In A Leather Car Seat?
Fixing a leather car seat rip costs between $75 and $300. Price varies based on damage size and repair quality. Professional services may charge more, while DIY kits are cheaper. For quality results, consult a specialist in leather seat repairs.
What Is The Best Way To Repair A Tear In Leather?
Use a leather repair kit for best results. Clean the area, apply adhesive, and let it dry. Use a matching leather dye to blend. Buff the surface gently for a smooth finish. Always follow the kit instructions for optimal repair.
Regular maintenance prevents future tears.
Do Leather Repair Kits Actually Work?
Leather repair kits can effectively fix minor damages and scratches. Quality kits offer satisfactory results. They work well on small tears, cracks, or worn areas. Follow instructions carefully for the best outcome. Choose reputable brands for reliable repairs. Regular maintenance enhances longevity and appearance.
Kits provide a cost-effective solution for leather restoration.
How To Fix A Rip In A Car Seat?
Clean the area and trim loose threads. Apply fabric glue or a repair patch. Let it dry. For large rips, consider a professional repair. Regular maintenance helps prevent future damage.
Conclusion
Repairing a tear in a leather car seat can seem tough. With the right tools, it’s simpler than you think. Follow the steps carefully. Inspect the damage first. Choose the correct repair kit. Clean the area thoroughly. Apply the patch or filler as needed.
Let it dry completely. Check the repair for durability. A well-repaired seat boosts your car’s look. Regular maintenance prevents future tears. Keep your leather seats looking fresh and neat. Enjoy a comfortable drive with a well-maintained interior. Anyone can repair a seat with patience and care.